
Archives
♥♥♥ How to Restart Windows without Restarting your PC ♥♥♥
When you click on the SHUTDOWN button,
make sure to simultaneous press SHIFT Button.
If you hold the Shift key down while clicking on SHUTDOWN button,
you computer would restart without restarting the Computer.
This is equivalent to term "HOT REBOOT".
♥♥♥ Changing the default launch app ♥♥♥
The information that Explorer looks up to find which program should be used to launch specific
file types is stored in the System Registry under the HKEY_CLASSES_ROOT section. Using the Registry Editor, it is possible to browse to that key and then find the file type that you want to change and edit some keys, but there is a much easier way in Windows XP to accomplish the same task. Hidden away in Folder Options within any Explorer window resides a useful utility to change the default application easily without having to worry about application IDs and file association structure. Just follow these steps to change any File Types default launch app:
1. Open up My Computer by clicking the desktop icon or on the icon in the Start panel.
file types is stored in the System Registry under the HKEY_CLASSES_ROOT section. Using the Registry Editor, it is possible to browse to that key and then find the file type that you want to change and edit some keys, but there is a much easier way in Windows XP to accomplish the same task. Hidden away in Folder Options within any Explorer window resides a useful utility to change the default application easily without having to worry about application IDs and file association structure. Just follow these steps to change any File Types default launch app:
2. When you have My Computer displayed on your screen, click the Tools menu bar item and select Folder Options.
3. Once the Folder Options window appears, click the File Types tab.
4. Navigate through the list of file extensions until you find the extension of the file for which you want to change the default app. Because I want to change my MP3 player default launch app, I am going to select the MP3 file extension.When you find the file extension that you want to change, select it by clicking it.
5. Click the Change button once you have your extension selected, as shown in Figure 1. The Open With properties window will load, asking you what program to load it with. It will show a list of common programs that you can choose from, but you are not limited to just those programs. Click the Browse button to navigate to any executable file on your computer to specify exactly what program you want to use if it is not on the list.
6. Once you have the application selected that you want to use, just click the OK button to save your changes. You are now finished with changing the launch app. Your changes to file launch apps are activated immediately after you click OK to save your changes. Now you will no longer have to worry about applications taking control of your files.
 FIGURE -1: Changing the default launch app for MP3 files.
♥♥♥ Changing the icon of any file type ♥♥♥
So far, you have learned how to change the icons of the desktop icons. This next section will show you how you can change the default icon that is displayed for any file type on your computer. Changing the icons is actually very easy; the most difficult part of the process is trying to figure out what icon to use. Additionally, keep in mind that you can use any of the new high resolution icons that you can download from the sites mentioned in the Changing the Desktop To get started changing your icons, you are going to want to use the Folder Options feature you used in the last section. Follow these steps to begin:
1. Open up Folder Options again by clicking My Computer. Then when it launches, click
the Tools menu bar entry and select Folder Options.
 FIGURE 2: Changing the icon of a specific file type.
2. Inside Folder Options, click the File Types tab to reveal the list of all of the different file
extensions on your computer.
3. Browse through the list and select the extension for which you want to change the icon.
4. Once you have the entry selected, click the Advanced button.
5. On the Edit File Type screen, click the Change Icon button, as shown in Figure 2.
6. The Change Icon screen will be displayed. Here, you will be shown various system icons
from which you can choose. If you do not find any that you like, just click the Browse
button and select an icon that you downloaded on your computer.
7. Once you find the perfect icon, click OK to select the new icon.
8. Then click OK once more to save your changes.
You don’t have to reboot after you make your changes, because you will see your changes
immediately after you click OK to save them.
♥♥♥ Get the keyboard on your desktop screen ♥♥♥
Do you want to use an onscreen keyboard .
Its simple:
Just go to start press run.
Now type osk and
press enter.
♥♥♥ Use of print screen for some fun ♥♥♥
You know the use of Print screen button on the keyboard [present on top right above insert] .
It captures the screen , right ?
But now I will tell you how to use it for some fun .
Take screen shot of the desktop by pressing Print Screen on the desktop .
Go to Paint and paste this .
Save it .
For Windows XP users
1) On the desktop right click -----> arrange icons by ----> De-select 'Show Desktop Icons '.
2) Now right click the taskbar and select properties .
3) Check auto hide the taskbar. Click OK.
4) Now change your wallpaper and keep the one you saved earlier.
5) If paint is not closed, select File ---------> 'Set as background (Centered) '.
Now on the desktop even if you click any icon nothing will happen !!!
Now do I need to tell youhow you can use it for fun on someone else's PC ?
To revert back to normalcy change the wallpaper and select 'show desktop icons' on the right click menu .
♥♥♥ Hidden programs in windows-XP ♥♥♥
Is it strange to hear , but true that some good programs are hidden in Windows XP !!!
Programs :
1. Private Character Editor :
Used for editing fonts,etc.
** start>>Run
** Now, type eudcedit
2. Dr. Watson :
This an inbuilt windows repairing software !
** start>>Run
** Now, type drwtsn32
3. Media Player 5.1 :
Even if you upgrade your Media Player, you can still access your old player in case the new one fails !!!
** start>>Run
** Now, type mplay32
4. iExpress :
Used to create SetupsYou can create your own installers !
** start>>Run
** Now, type iexpress
♥♥♥ Error reporting in XP ♥♥♥
 If error reporting in XP is bugging you then turn it off.
When a system error occurs in XP, a little dialog box appears asking if you want to report the error to Microsoft.
To disable error reporting, follow these directions:
1. Right-click My Computer and choose Properties.
2. Click the Advanced tab on your System Properties dialog box.
3. Click the Error Reporting button on the Advanced tab.
4. Place a checkmark next to "Disable error reporting."
5. Leave the other radio button unchecked next to the text labeled, "But notify me when critical errors occur."
6. Click OK.
Using the wallpaper PowerToy
We all like changing our wallpaper every once in a while.We get tired of staring at the same old photo or pattern and like to select a new image that we downloaded on the Web or made ourselves.
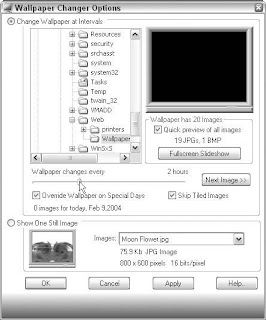 FIGURE 1: Using the Wallpaper Changer PowerToy to customize the desktop by adding
rotating wallpapers. Back in April of 2003, Microsoft released a series of creativity fun packs that included all sorts of neat things, such as different types of themed templates as well as a few new PowerToys. One of those PowerToys was called the Wallpaper Changer. This PowerToy is an application that will automatically rotate your wallpaper over a given period of time that you set. Additionally, you can specify a folder of images to use so that you can control which images are rotated. I like to use the Wallpaper Changer to change my wallpaper weekly, although it is possible to set it up to change your wallpaper every 15 minutes. If the Wallpaper Changer is something that interests you, visit www.microsoft.com/windowsxp/experiences/downloads/
 FIGURE 1: Using the Wallpaper Changer PowerToy to customize the desktop by adding
create_powertoy.asp to download a copy yourself. Then, follow these steps to configure
it.
1. Once you have installed the Wallpaper Changer PowerToy, you can start it up by clicking the Start Menu, navigating to All Programs, expanding PowerToys for
Windows XP, and then selecting Wallpaper Changer.
2. When the Wallpaper Changer has loaded, select the folder that you want to use as your source of the images using the browsing box.
3. Then, just set the interval between wallpaper changes by sliding the marker across the line, as shown in Figure 1.
4. Once you have the interval set, just click OK and your settings will be saved.
The Wallpaper Changer will allow you to customize your desktop like never before. Now you will always have a nice-looking desktop that is always new.
Customizing the icon drop shadow effect
1. Click the Start button, and select Run.
2. Key in sysdm.cpl and click OK to launch system properties.
3. Click the Advanced tab, and then click the Settings button under the Performance section.
4. While on the Visual Effects tab, scroll down to the bottom of the box.
5. Locate Use Drop Shadows for Icon Labels on the Desktop, as shown in Figure 3-1, and check or uncheck the value, depending on what you would like to do.
6. Click OK to save your changes.
7. Click OK once more to close the System Properties window.
Fun with Active Desktop
Active Desktop has been a feature of Windows ever since Windows 98. Over time, it has changed a lot and has become a very powerful feature when it is used to its full potential. I use the ability to display a Web page file as my background feature of Active Desktop to customize the way that I use my computer. Because you are able to display a Web page, the kind of information that you can display on your desktop is only limited to your knowledge of HTML (HyperText Markup Language), which is the language used to create Web pages. If you are new to HTML, then I suggest you get a book on it, such as Creating Web Pages For Dummies, or at least read a lot about HTML on the Web. For the purpose of this section, I am going to assume that you know a little HTML, or at least know how to use an HTML editor such as Microsoft FrontPage. To give you an idea of what you can do with Active Desktop, I have written a short little Web page in HTML that I could use to help me get to work the best possible way. Currently, I live in the suburbs of Chicago and commute to work every day. During the summer, I like to take the train instead of driving to avoid wasting my time in traffic. However, because I have a long walk to get to work once I get off the train, I have to listen to the weather report to see if I should drive because I don’t want to be soaked when I get to work if it rains.To speed up my routine in the morning, I could use Active Desktop to display the Web page that I created, which displays a live Chicago weather radar image on the desktop, as shown in Figure 2.
This way, I don’t even have to waste time going to any Web site; I just have to look at my desktop on my computer and I can instantly judge for myself if it looks like it is going to be rainingin the near future.There are actually even cooler things that you can do with your Web page if you know HTML well enough. You can add links to your Web page that you can access on your desktop to launch programs or visit Web sites. Additionally, if you are very talented in HTML and other Web technologies such as ASP, you could write a Web page that is one big frame that points to an Active Server Page on an external Web server. Then you can program that external page to do almost anything you can think of, such as gathering news headlines or other data. Okay, now that you know what you can do with this cool feature, I am going to show you how you can take advantage of it as well. The first part of using this feature is coming up with a Web page to set as your background. The following is the source code for my Web page that I am using to display my weather radar:
 FIGURE 2: Using Active Desktop to display a Web page as the desktop.
This is the content of my Web page file that is saved as radarpage.htm. Basically, the most important line in the code above is the META Refresh line. This is the line that automatically tells my browser, or Active Desktop, to refresh the page every 10 seconds. That way, I will nalways have an up-to-date radar image displayed on my desktop. All of the other lines are just standard HTML tags.
If you want to create a file like this, just open up Notepad and type in your HTML code and then save the file with an .htm extension. Now, once you have your Web page made in either Notepad or a nice HTML editor, you are ready to set it up to be used as your desktop.To do this, follow these steps:
1. Right-click your Desktop and select Properties.
2. Next, click the Desktop tab and then click the Browse button that is located on the middle-right side of the window.
3. Navigate through your computer and select the Web page that you created to use as your background and then click OK to select it.
4. Click OK once more to save your changes and you are finished.
You will have to wait a few seconds as Active Desktop loads your desktop for the first time. After that, the display properties window will go away and you should see your new desktop.
Have fun with this feature. If you learn HTML well enough, you can even start to include images that you make yourself to really give your computer a customized look and feel.
Removing the text below the icons
1. Start with the first icon that you want to rename: right-click it and select Rename.
2. Select all of the text, and erase it with the Backspace key.
3. Now, enter in the ASCII code for the space, so make sure your Numlock is on, and just
press and hold the Alt key while typing in 0 1 6 0 on the numpad on the right of the
keyboard.
4. When you have finished typing in 0 1 6 0, let go of the Alt key and the blank space will be inserted.
5. Then, just press Enter to save the new name. If you want to remove the text of multiple icons, then you will have a problem with the instructions
because each shortcut or item must still have a unique name. One easy workaround is to enter in the ASCII code as the previous directions indicate, and then add a space using the spacebar after it. The first icons will have the ASCII space code + one space, the second icon will have the ASCII space code + two spaces, and so on.
Renaming the Recycle Bin
The Recycle Bin is a great feature of Windows, but it is very difficult to customize the name. Unlike other system icons on the desktop, you cannot just right-click it and select Rename. The only way to rename the Recycle Bin is to hack the Registry. This is not as simple as the method for the other icons, but you can easily get through it.To get started, let’s assume that you want to rename the Recycle Bin as Trash Compactor:
1. Click the Start button and select Run.
2. Then type regedit in the box and click OK.
3. When the Registry Editor is started, you will want to expand the HKEY_CURRENT
_USER, Software, Microsoft,Windows, CurrentVersion, Explorer, CLSID, and
{645FF040-5081-101B-9F08-00AA002F954E} folders.
 4. When you have expanded the last folder, you should see an entry called (Default) that has no value. Right-click that entry and select Modify.
5. Next, just type Trash Compactor, or any other name, in the box and click OK. If
you want to hide the text under the Recycle Bin icon, you will still have to specify a
name. Instead of typing in a word, just click the spacebar once and then click OK.
You do not have to worry about entering in the ASCII code for a space when editing the registry.
6. Close the Registry Editor and press F5 when viewing your desktop to see your changes. If that does not work for your computer, then you will have to log out and log in to activate the changes.Now your Recycle Bin is no more. Hello Trash Compactor!
Removing the shortcut arrow from icons on the desktop
1. Click the Start Menu and expand All Programs, PowerToys for Windows XP, and then select Tweak UI to start it up.
2. Once Tweak UI is started, expand the Explorer entry and select Shortcut.
3. You will now see four different icon Shortcut Overlay options. I recommend you try using the light arrow options first. Then if you still don’t like it, click None to remove the shortcut arrows.
4. Once you have made up your mind and selected the Overlay option, click OK to save your changes.
You may now close Tweak UI. Your changes will show up after you reboot.
Windows XP, and then selecting Wallpaper Changer.
2. When the Wallpaper Changer has loaded, select the folder that you want to use as your source of the images using the browsing box.
3. Then, just set the interval between wallpaper changes by sliding the marker across the line, as shown in Figure 1.
4. Once you have the interval set, just click OK and your settings will be saved.
The Wallpaper Changer will allow you to customize your desktop like never before. Now you will always have a nice-looking desktop that is always new.
Customizing the icon drop shadow effect
The Use Drop Shadows for Icon Labels on the Desktop can be turned on or off. Depending on the wallpaper that you are using, you may like or dislike the feature. I really like the new effect, but if you like having a clean and crisp interface, I recommend disabling the effect.
Follow these steps to turn the feature on or off:
1. Click the Start button, and select Run.
2. Key in sysdm.cpl and click OK to launch system properties.
3. Click the Advanced tab, and then click the Settings button under the Performance section.
4. While on the Visual Effects tab, scroll down to the bottom of the box.
5. Locate Use Drop Shadows for Icon Labels on the Desktop, as shown in Figure 3-1, and check or uncheck the value, depending on what you would like to do.
6. Click OK to save your changes.
7. Click OK once more to close the System Properties window.
Fun with Active Desktop
Active Desktop has been a feature of Windows ever since Windows 98. Over time, it has changed a lot and has become a very powerful feature when it is used to its full potential. I use the ability to display a Web page file as my background feature of Active Desktop to customize the way that I use my computer. Because you are able to display a Web page, the kind of information that you can display on your desktop is only limited to your knowledge of HTML (HyperText Markup Language), which is the language used to create Web pages. If you are new to HTML, then I suggest you get a book on it, such as Creating Web Pages For Dummies, or at least read a lot about HTML on the Web. For the purpose of this section, I am going to assume that you know a little HTML, or at least know how to use an HTML editor such as Microsoft FrontPage. To give you an idea of what you can do with Active Desktop, I have written a short little Web page in HTML that I could use to help me get to work the best possible way. Currently, I live in the suburbs of Chicago and commute to work every day. During the summer, I like to take the train instead of driving to avoid wasting my time in traffic. However, because I have a long walk to get to work once I get off the train, I have to listen to the weather report to see if I should drive because I don’t want to be soaked when I get to work if it rains.To speed up my routine in the morning, I could use Active Desktop to display the Web page that I created, which displays a live Chicago weather radar image on the desktop, as shown in Figure 2.
This way, I don’t even have to waste time going to any Web site; I just have to look at my desktop on my computer and I can instantly judge for myself if it looks like it is going to be rainingin the near future.There are actually even cooler things that you can do with your Web page if you know HTML well enough. You can add links to your Web page that you can access on your desktop to launch programs or visit Web sites. Additionally, if you are very talented in HTML and other Web technologies such as ASP, you could write a Web page that is one big frame that points to an Active Server Page on an external Web server. Then you can program that external page to do almost anything you can think of, such as gathering news headlines or other data. Okay, now that you know what you can do with this cool feature, I am going to show you how you can take advantage of it as well. The first part of using this feature is coming up with a Web page to set as your background. The following is the source code for my Web page that I am using to display my weather radar:
 FIGURE 2: Using Active Desktop to display a Web page as the desktop.
Hacking Windows XP Active Desktop Demonstration
This is the content of my Web page file that is saved as radarpage.htm. Basically, the most important line in the code above is the META Refresh line. This is the line that automatically tells my browser, or Active Desktop, to refresh the page every 10 seconds. That way, I will nalways have an up-to-date radar image displayed on my desktop. All of the other lines are just standard HTML tags.
If you want to create a file like this, just open up Notepad and type in your HTML code and then save the file with an .htm extension. Now, once you have your Web page made in either Notepad or a nice HTML editor, you are ready to set it up to be used as your desktop.To do this, follow these steps:
1. Right-click your Desktop and select Properties.
2. Next, click the Desktop tab and then click the Browse button that is located on the middle-right side of the window.
3. Navigate through your computer and select the Web page that you created to use as your background and then click OK to select it.
4. Click OK once more to save your changes and you are finished.
You will have to wait a few seconds as Active Desktop loads your desktop for the first time. After that, the display properties window will go away and you should see your new desktop.
Have fun with this feature. If you learn HTML well enough, you can even start to include images that you make yourself to really give your computer a customized look and feel.
Removing the text below the icons
1. Start with the first icon that you want to rename: right-click it and select Rename.
2. Select all of the text, and erase it with the Backspace key.
3. Now, enter in the ASCII code for the space, so make sure your Numlock is on, and just
press and hold the Alt key while typing in 0 1 6 0 on the numpad on the right of the
keyboard.
4. When you have finished typing in 0 1 6 0, let go of the Alt key and the blank space will be inserted.
5. Then, just press Enter to save the new name. If you want to remove the text of multiple icons, then you will have a problem with the instructions
because each shortcut or item must still have a unique name. One easy workaround is to enter in the ASCII code as the previous directions indicate, and then add a space using the spacebar after it. The first icons will have the ASCII space code + one space, the second icon will have the ASCII space code + two spaces, and so on.
Renaming the Recycle Bin
The Recycle Bin is a great feature of Windows, but it is very difficult to customize the name. Unlike other system icons on the desktop, you cannot just right-click it and select Rename. The only way to rename the Recycle Bin is to hack the Registry. This is not as simple as the method for the other icons, but you can easily get through it.To get started, let’s assume that you want to rename the Recycle Bin as Trash Compactor:
1. Click the Start button and select Run.
2. Then type regedit in the box and click OK.
3. When the Registry Editor is started, you will want to expand the HKEY_CURRENT
_USER, Software, Microsoft,Windows, CurrentVersion, Explorer, CLSID, and
{645FF040-5081-101B-9F08-00AA002F954E} folders.
4. When you have expanded the last folder, you should see an entry called (Default) that has no value. Right-click that entry and select Modify.
5. Next, just type Trash Compactor, or any other name, in the box and click OK. If
you want to hide the text under the Recycle Bin icon, you will still have to specify a
name. Instead of typing in a word, just click the spacebar once and then click OK.
You do not have to worry about entering in the ASCII code for a space when editing the registry.
6. Close the Registry Editor and press F5 when viewing your desktop to see your changes. If that does not work for your computer, then you will have to log out and log in to activate the changes.Now your Recycle Bin is no more. Hello Trash Compactor!
Removing the shortcut arrow from icons on the desktop
1. Click the Start Menu and expand All Programs, PowerToys for Windows XP, and then select Tweak UI to start it up.
2. Once Tweak UI is started, expand the Explorer entry and select Shortcut.
3. You will now see four different icon Shortcut Overlay options. I recommend you try using the light arrow options first. Then if you still don’t like it, click None to remove the shortcut arrows.
4. Once you have made up your mind and selected the Overlay option, click OK to save your changes.
You may now close Tweak UI. Your changes will show up after you reboot.


